深度探索DxFramework 3-1
Table of Contents
请尊重原作者的工作,转载时请务必注明转载自:www.xionggf.com
第3章 步入二维游戏的世界 1
3.1 二维动画的原理
在介绍计算机动画的原理之前,先谈谈大家都非常熟悉的电影的播放原理。播放电影的时候需要一大盘的电影胶片。胶片上面就是一帧一帧连续的静止图像。当播放的时候,把胶片按播放顺序,依次通过播放机的镜头,这样胶片上的图像将会逐帧投影到银幕上。因为人眼存在着视觉暂留的生理现象。当眼睛正在观察的物体突然消失的时候,被观察的物体还能在人眼中存留约1/24秒左右。因此,只要一系列本来就是连续的静止的图像,当以合适的速度逐个通过人眼的时候。便会产生连续的“会动”的视觉效果。
根据人的视觉存留时间可以知道,当电影胶片以每秒24帧的速度播放时,人们看到的就是和现实生活中速度相同的画面。当电影胶片以每秒大于24帧的速度播放时,画面中的各种动作将会变快,这就是俗称的“快镜头”。而如果电影胶片以每秒低于24帧的速度播放时,画面中的各种动作将会变慢,这就是俗称的“慢镜头”。
计算机动画的原理和播放电影的原理是类似的。举一个简单的二维动画例子:假如要做一个人物走动的二维动画,首先要研究人走路时身体各部位,如躯干、四肢移动摆动的位置。然后按相应时间相应的位置,把这些连续动作绘制成一副副的图。在计算机中就可以存储在一些图片文件中。这些“一副副的图”其实就是类似于电影胶片。把图从磁盘文件中载入到内存,然后按顺序将其逐帧在屏幕中绘制出来,就类似于播放电影的过程。当一组动作播放完成后,再从头从动作的第一帧播放,周而复始,就形成了连贯的动画。
三维动画和二维动画播放原理是一致的,也是一帧一帧地在屏幕中绘制。与二维动画类似,三维动画也可以分实时和非实时。我们玩的三维计算机游戏的游戏画面其实就可以认为是一种实时三维动画,这些画面都是在每一帧显示前由计算机实时地计算生成。非实时三维动画则用相关软件预先逐帧计算好并且存储在文件中,播放的时候从文件中逐帧读取数据显示即可。在本章中先讨论二维动画。
3.2 基础数学工具
接着介绍是vector2.h文件中的模板类和函数。VECTOR2定义了一个二维矢量的模板类。
#pragma once
#include "globals.h"
#include "error.h"

//最小误差,意思是两浮点数之差为小于0.0001的时候,
//就认为这两浮点数是相等的。
const XFLOAT VECTOR2_ZERO_TOLERANCE = 0.0001;

/* MSVC6 cannot use the overloaded
operators due to a compiler bug/feature */
#if _MSC_VER < 1300
#ifndef NO_TEMPLATE_SELECTION
#define NO_TEMPLATE_SELECTION
#endif
#endif

template< class T >
class VECTOR2
{
public:
   VECTOR2() {}
   VECTOR2(const T& x, const T& y) : x(x), y(y) {}

   //复制Direct3D的D3DXVECTOR2类型数据的内容
   VECTOR2(const D3DXVECTOR2& v) : x((T)v.x), y((T)v.y) {}

   //把VECTOR2类型的数据转化成D3DXVECTOR2类型
   inline D3DXVECTOR2 ToD3DXVECTOR2() const
   {
       return D3DXVECTOR2((float)x,(float)y);
   }

   //重载负号操作符,VECTOR2的取相反数操作。
   inline VECTOR2 operator- () const
   {
       return VECTOR2(-x, -y);
   }

   //重载加号操作符,VECTOR2的加法操作。
   inline VECTOR2 operator+ (const VECTOR2& v) const
   {
       return VECTOR2(this->x + v.x, this->y + v.y);
   }

   //重载加号操作符,VECTOR2的加法操作
   inline VECTOR2 operator- (const VECTOR2& v) const
   {
       return VECTOR2(this->x - v.x, this->y - v.y);
   }

   //重载乘号操作符,VECTOR2的垂直乘法操作。即,
   //两矢量的各个对应分量独自相乘,得出的值作为一个新矢量的分量。
   inline VECTOR2 operator* (const VECTOR2& v) const
   {
       return VECTOR2(this->x * v.x, this->y * v.y);
   }

   //重载除号操作符,VECTOR2的垂直除法操作。即,两矢量的各个
   //对应分量独自相除,得出的值作为一个新矢量的分量。
   inline VECTOR2 operator/ (const VECTOR2& v) const
   {
       return VECTOR2(this->x / v.x, this->y / v.y);
   }

#ifndef NO_TEMPLATE_SELECTION
   template < class U >
   inline VECTOR2 operator+ (const U& a) const
   {
       return VECTOR2(this->x + a, this->y + a);
   }

   template < class U >
   inline VECTOR2 operator- (const U& a) const
   {
       return VECTOR2(this->x - a, this->y - a);
   }

   template < class U >
   inline VECTOR2 operator* (const U& a) const
   {
       return VECTOR2(this->x * a, this->y * a);
   }

   template < class U >
   inline VECTOR2 operator/ (const U& a) const
   {
       return VECTOR2(this->x / a, this->y / a);
   }

#endif
   //重载自加操作
   inline void operator+= (const VECTOR2& v)
   {
       this->x += v.x;
       this->y += v.y;
   }

   //重载自减操作
   inline void operator-= (const VECTOR2& v)
   {
       this->x -= v.x;
       this->y -= v.y;
   }

   //重载垂直自乘操作
   inline void operator*= (const VECTOR2& v)
   {
       this->x *= v.x;
       this->y *= v.y;
   }

   //重载垂直自除操作
   inline void operator/= (const VECTOR2& v)
   {
       this->x /= v.x;
       this->y /= v.y;
   }

   //如果两矢量的各个相对应的分量都相等,则都相等
   inline bool operator== (const VECTOR2& v) const
   {
       return ((this->x == v.x) && (this->y == v.y));
   }

   inline bool operator!= (const VECTOR2& v) const
   {
       return ((this->x != v.x) || (this->y != v.y));
   }

#ifndef NO_TEMPLATE_SELECTION

   template < class U >
   inline void operator+= (const U& a)
   {
       this->x += a;
       this->y += a;
   }

   template < class U >
   inline void operator-= (const U& a)
   {
       this->x -= a;
       this->y -= a;
   }

   template < class U >
   inline void operator*= (const U& a) {
       this->x *= a;
       this->y *= a;
   }

   template < class U >
   inline void operator/= (const U& a)
   {
       this->x /= a;
       this->y /= a;
   }

   template < class U >
   inline bool operator== (const U& a) const
   {
       return ((this->x == a) && (this->y == a));
   }

   template < class U >
   inline bool operator!= (const U& a) const
   {
       return ((this->x != a) || (this->y != a));
   }
#endif

   //矢量自加一个标量,即矢量的各个分量加上一个相同的标量
   template < class U >
   inline VECTOR2 ScalarAddition(const U& a) const
   {
       return VECTOR2(this->x + a, this->y + a);
   }

   //矢量自减一个标量,即矢量的各个分量减去一个相同的标量
   template < class U >
   inline VECTOR2 ScalarSubtraction(const U& a) const
   {
       return VECTOR2(this->x - a, this->y - a);
   }

   //矢量自乘一个标量,即矢量的各个分量乘上一个相同的标量
   template < class U >
   inline VECTOR2 ScalarMultiplication(const U& a) const
   {
       return VECTOR2(this->x * a, this->y * a);
   }

   //矢量自除一个标量,即矢量的各个分量除上一个相同的标量
   template < class U >
   inline VECTOR2 ScalarDivision(const U& a) const
   {
       return VECTOR2(this->x / a, this->y / a);
   }

   //判断两矢量是否相等
   template < class U >
   inline bool IsEqualTo(const U& a) const
   {
       return ((this->x == a) && (this->y == a));
   }

   //判断两矢量是否不等
   template < class U >
   inline bool IsNotEqualTo(const U& a) const
   {
       return ((this->x != a) || (this->y != a));
   }

   //判断两矢量的距离,令两矢量为V1(x1,y1),
   //V2(x2,y2)其计算公式为
   inline XFLOAT DistanceTo(const VECTOR2& v) const
   {
       return sqrt(pow(this->x - v.x,2) +
                   pow(this->y - v.y,2));
   }

   //求两矢量的夹角。
   inline XFLOAT AngleTo(const VECTOR2& v) const
   {
       if ((v.x - this->x) == 0)
           throw Error( _T("AngleTo going to
                       divide by zero!"),
                       __FILE__, __LINE__ );

       XFLOAT angle = atan((v.y - this->y)/(v.x - this->x));
       if ((v.x - this->x) < 0)
       {
           angle += D3DX_PI;
       }
       return angle;
   }

   //求本矢量的模
   inline XFLOAT Magnitude() const
   {
       return sqrt(pow(x,2) + pow(y,2));
   }

   //单位化(规格化)本矢量
   inline void Normalize()
   {
       XFLOAT m = Magnitude();

       if (m <= VECTOR2_ZERO_TOLERANCE)
       {
           m = 1;
       }

       x /= m;
       y /= m;

       if (abs(x) < VECTOR2_ZERO_TOLERANCE) x = 0;
       if (abs(y) < VECTOR2_ZERO_TOLERANCE) y = 0;
   }

   //求两矢量的点积
   //令两矢量为V1(x1,y1) V2(x2,y2)
   //则两矢量的点积应为x1*x2+y1*y2;而此处的计算方式变成:
   //sqrt( X1*X2*X1*X2+y1*y2*y1*y2 ),
   //显然此处的矢量点积计算是错误的。
   inline XFLOAT DotProduct(const VECTOR2& v)
   {
       return ((*this) * v).Magnitude(); //错误的计算方式

   }

   //求两矢量的叉积
   inline XFLOAT CrossProduct(const VECTOR2& v)
   {
       return (this->x * v.y) - (this->y * v.x);
   }

   T x;    //矢量的x分量
   T y;    //矢量的y分量
};

typedef VECTOR2< int > IVECTOR2;   //整数类型的二维矢量
typedef VECTOR2< float > FVECTOR2; //单精度类型的二维矢量
typedef VECTOR2< double > DVECTOR2;    //双精度类型的二维矢量

//把某矢量的每一个分量化格式成字符串
template< class T >
tstring toTString(const VECTOR2< T >& v)
{
   return tstring( _T("(") + toTString(v.x) + _T(",") +
                   toTString(v.y) + _T(")"));
}
3.3 基本的颜色理论
3.3.1 颜色的基本要素
3.3.2 颜色模型
3.4 DxFramework的纹理类
3.4.1 纹理的基本概念
在计算机图形学发展的早期,计算机生成的3D图像往往像是一块能反射强光的塑料。和自然界的各种物体相比,早期的3D图像缺乏各种纹路——如磨损、裂痕、指纹和污渍等,而这些纹路会增加三维物体的真实感。正因为如此,计算机图形学发展至今,纹理(texture)已经在得到普遍的应用,成为增强计算机生成的三维图像的真实感的重要工具。
在日常生活中,人们经常使用名词“纹理”来表示某个物体的光滑度或粗糙度。在计算机图形学中,纹理指的是一张表示物体表面细节的位图。在这里请注意这个位图不单单指Windows平台上以bmp为后缀名的图像文件格式。而“纹理贴图”(texture mapping)作为一个动宾式短语理解时,可以理解为使用图像,函数,或者是其他的数据源来改变物体的外观。
在Direct3D中,纹理可以贴在3D图元(primitive)的表面。例如,应用程序可以创建一个长方体,通过给这个长方体的六个表面都贴上一张木纹外观的纹理,从而使得这个长方体看起来像一个表面刨平打磨光滑了的木方。可以把草皮、泥土和岩石等纹理贴在构成山的图元的表面,这样就能得到看起来很真实的山坡。同样地,应用程序也可以通过使用纹理创建具有不同外观效果的三维图形。如:路边的路标,悬崖断层的岩层,或是地面上镶嵌的大理石地板,等等。
除了应用在3D图元上,纹理还可以应用在2D精灵上。DirectX8.1提供了ID3DXSprite接口,通过给此接口指定一个将要“贴”给2D精灵的纹理,ID3DXSprite接口将能自动地利用此纹理来绘制2D精灵。
3.4.2. 跨度和宽度
一般地,我们脑海中的纹理大都是二维的呈矩形状,有着高度和宽度(当然也有三维的纹理,在此就不作详叙)。纹理划分成一个个texel。texel的个数就是纹理的高度值乘以宽度值。这也就是所谓的纹理逻辑视图。如图:
但是在计算机存储空间中,纹理中每一个texel实际上是按照线性顺序一条线排列下去的,而不是像在逻辑视图中分为多行。如图:
所谓的跨度就是指在纹理逻辑视图中,每两行,垂直相邻的两个texel之间的内存偏移量。如图中的第1个texel和第6个texel的偏移量。必须注意的是,纹理的跨度并不一定是和纹理的宽度相等的。因为并不是所有的显示卡都能按照“跨度等于宽度”的方式来安排纹理所处的内存的。比如,在真实的内存空间中摆放完逻辑视图中的第一行texel之后,如果不是马上接着就摆放第二行texel,而是中间隔了若干个字节才摆放逻辑视图中的第二行texel的话,很显然,此时的跨度值就大于宽度值。
DirectX提供了检测显卡支持最大纹理宽度的功能。使用IDirect3DDevice8::GetDeviceCaps(D3DCAPS8* pCaps)函数和D3DCAPS8结构体能检测到当前的显卡的能力,如下:
//m_pd3dDevice是一个IDirect3DDevice8类型的指针
D3DCAPS8 d3dCaps;
m_pd3dDevice->GetDeviceCaps( &d3dCaps );

C_Texture类是对IDirect3DTexture8接口的进一步封装。此类实现了对纹理的内存管理。此类在程序中主要由2D精灵类C_Sprite和3D图元类C_Primitive所使用,

map<tstring, TextureInfo>	C_Texture::infoMap; //纹理信息映射表
C_Texture::C_Texture(const tstring& saveFileName, int width, int height)
{
    multipleLevel = false;
    this->filename = saveFileName;
    this->width = width;
    this->height = height;
    texture = NULL;

    //纹理是否已经载入
    if (infoMap.size())
    {	    //要确保在已创建的纹理中,没有和要创建的纹理的名字同名
        //如果要创建的纹理的名字,在纹理信息映射表中已经存在的话
        if(infoMap.find(filename) != infoMap.end())
        {
            TextureInfo temp = infoMap[filename];

            // 检查要创建的纹理的高度,宽度,multipleLevel
            // 是否和已存在的同名纹理相等如果不相等的话,则抛出异常。
            if ((multipleLevel != temp.multipleLevel) || (width != temp.imageInfo.Width) ||   (height != temp.imageInfo.Height))
            {
                    hrow Error(_T("C_Texture(): tried to load same texture with different width or height or multipleLevel"));
            }

            //如果要创建的纹理的属性和已存在的同名纹理的都相等,那么表
            //示该纹理已经从磁盘文件中载入并创建对本纹理的引用计数加1
            texture = infoMap[filename].texture;
            ++(infoMap[filename].count); //引用计数加1
            return;
        }
    }

    //如果还没有纹理从磁盘文件中载入并创建,或者是已创建的纹理中,
    //和要创建的纹理的名字同名,则调用Direct3D库函数
    //D3DXCreateTexture,创建一张空白的纹理
    TextureInfo info;
    HRESULT hr = D3DXCreateTexture(C_View::p_D3DDevice, width, height, 0, D3DX_DEFAULT, D3DFMT_A8R8G8B8, D3DPOOL_MANAGED,
    &(info.texture));
    if (FAILED(hr))
            throw Error(_T("CreateNewTexture(): D3DXCreateTexture "),__FILE__,__LINE__,hr);
    info.count = 1;
    info.multipleLevel = multipleLevel;
    info.colorKey = NULL;
    info.imageInfo.Width = width;
    info.imageInfo.Height = height;

    //保存好本纹理的IDirect3DTexture8接口
    texture = info.texture;
    //保存好本纹理的属性信息到纹理信息映射表中去
    infoMap[filename] = info;
    p_Pixels = NULL;
}
分析完了上面的构造函数,重点分析库函数D3DXCreateTexture。第四个参数是mip level的设定,当其值为0或者是D3DX_DEFAULT的时候,完全的mipmap chain将会被创建。第五个参数,指定了纹理的Usage。第六个参数指定了纹理的像素格式,如下图,第七个参数设定为D3DPOOL_MANAGED,表示纹理将交给Direct3D进行管理。
C_Texture::C_Texture(const tstring& filename, bool multipleLevel, D3DCOLOR colorKey)
{
    this->multipleLevel = multipleLevel;
    this->filename = filename;
    texture = NULL;

    //要确保在已创建的纹理中,没有和要创建的纹理的名字同名。如果要创建的纹理的名字,在纹理信息映射表中已经存在的话
    if (infoMap.size())
    {
        if (infoMap.find(filename) != infoMap.end())
        {
            if ((multipleLevel != infoMap[filename].multipleLevel) || (colorKey != infoMap[filename].colorKey)){
                throw Error(_T("C_Texture(): tried to load same texture with different multipleLevel or colorKey"));
            }

            // 如果要创建的纹理的属性和已存在的同名纹理的都相等,那么表示该纹理已经从磁盘文件中载入并创建对本纹理的引用计数加1
            texture = infoMap[filename].texture;
            ++(infoMap[filename].count);
            return;
        }
    }

    HRESULT	hr;
    TextureInfo	info;
    tstring	pathname(IMAGE_DIR + filename);

    // 如果没有载入的话,则从磁盘文件中载入纹理图像数据根据是否使用多级渐进纹理,使用不同的创建标志
    if (multipleLevel)
    {
        hr =D3DXCreateTextureFromFileEx(C_View::p_D3DDevice, pathname.c_str(), 0, 0, D3DX_DEFAULT, 0, D3DFMT_A8R8G8B8,
            D3DPOOL_MANAGED, D3DX_DEFAULT, D3DX_DEFAULT, colorKey, &(info.imageInfo),NULL, &(info.texture));
    }
    else
    {
        // 对于2D项目而言,纹理的高宽值就不限定非得要2的整数次方大小。
        hr =D3DXCreateTextureFromFileEx(C_View::p_D3DDevice, pathname.c_str(), 0, 0, 1, 0, D3DFMT_A8R8G8B8,
                D3DPOOL_MANAGED, D3DX_FILTER_NONE, D3DX_DEFAULT, colorKey, &(info.imageInfo), NULL, &(info.texture));
    }

    if (FAILED(hr))
        throw Error(_T("CreateNewTexture(): D3DXCreateTextureFromFileEx ") + pathname,__FILE__,__LINE__,hr);

    info.count = 1;
    this->width = info.imageInfo.Width;
    this->height = info.imageInfo.Height;
    info.colorKey = colorKey;
    info.multipleLevel = multipleLevel;
    texture = info.texture;
    infoMap[filename] = info;
    p_Pixels = NULL;
}

//本纹理的引用计数减1
C_Texture::~C_Texture()
{
    --(infoMap[filename].count);
}

//把所有的纹理都清空释放掉
void C_Texture::PurgeTextures(bool shutdown)
{
    map<tstring, TextureInfo>::iterator iter =
    infoMap.begin();

    while (iter != infoMap.end())
    {
        if ((*iter).second.count < 0)
            throw Error(_T("texture count less than 0!"));

        //如果有纹理的引用计数小于0了,或者说强制性地关闭本纹理的使用了
        if ((*iter).second.count == 0 || shutdown)
        {
#ifdef _DEBUG
            //如果有纹理的引用计数大于0,但是又强制性地关闭
            //本纹理的使用的话,就要产生一个异常
            if ((*iter).second.count > 0)
            {
                Error e = Error(_T("texture count for ") + (*iter).first + _T(" on shutdown purge greater than 0!"));
                e.Prompt();
            }
#endif
            //把所有的纹理都清空释放
            tstring filename = (*iter).first;
            IDirect3DTexture8* texture =  (*iter).second.texture;
            iter++;
            SAFE_RELEASE(texture);
            infoMap.erase(infoMap.find(filename));
        }
        else{iter++;}
    }
}

int C_Texture::GetWidth()
{
    return infoMap[filename].imageInfo.Width;
}

int C_Texture::GetHeight()
{
    return infoMap[filename].imageInfo.Height;
}

tstring C_Texture::GetFilename()
{
    return filename;
}

IDirect3DTexture8* C_Texture::GetTexture()
{
    return texture;
}

//开始在纹理上进行绘制,即对纹理的像素数据进行操作
void C_Texture::BeginDrawing()
{
    if (multipleLevel)
    {     //首先要确保多级渐进纹理是不能被绘制的
            Error( _T("C_Texture::BeginDrawing : Cannot begin drawing for multiple resolution level texture"));
    }

    ZeroMemory(&lockedRect, sizeof(lockedRect));

    //把整张纹理都锁定,不能锁定时就抛出异常
    HRESULT hr = texture->LockRect(0, &lockedRect, NULL, 0);

    // Check if we can lock 原来的代码少了“throw语句”,bug
    if (FAILED(hr))
        throw Error(_T("C_Texture::BeginDrawing: Cannot lock texture"));

    //获取纹理的跨度(pitch),并且获取指向纹理的首地址指针
    pitch = lockedRect.Pitch;
    p_Pixels = (unsigned char *)lockedRect.pBits;
}

//结束对纹理的绘制,解除锁定
void C_Texture::EndDrawing()
{
    if (multipleLevel)
    {
        Error( _T("C_Texture::EndDrawing : Cannot end drawing for multiple resolutionlevel created texture"));
    }

    texture->UnlockRect(0);
    pitch = 0;
    p_Pixels = NULL;
}


//把当前的纹理数据存到磁盘文件中。保存成bmp文件格式
void C_Texture::SaveToFile()
{
    if (multipleLevel)
    {
        Error( _T("C_Texture::SaveToFile : Cannot save the texture for multiple resolution level texture"));
    }

    if (p_Pixels != NULL)
    {
        Error(_T("C_Texture::SaveToFile : Cannot save while drawing, use EndDrawing before you call this function"));
    }

    tstring nameTemp = IMAGE_DIR + filename;
    HRESULT hr = D3DXSaveTextureToFile(nameTemp.c_str(),D3DXIFF_BMP, texture, NULL);
    if (hr != D3D_OK)
        Error(  _T("C_Texture::SaveToFile : Cannot save texture"));
}


//从指定的颜色值中获取到该颜色的Alpha,Red,Green,Blue分量
void C_Texture::ObtainARGBFromColor(DWORD color, unsigned char *p_A, unsigned char *p_R, unsigned char *p_G, unsigned char *p_B)
{
    //从高位到低位,分别是A R G B
    //第31位到第24位是alpha分量,第23位到第16位是Red分量
    //第15位到第8位是Green分量,第7位到第0位是Blue分量

    //取最初的color值的第7位到第0位
    *p_B = (unsigned char) (color & 255);
    color = color >> 8; //右移8位

    //取最初的color值的第15位到第8位
    *p_G = (unsigned char) (color & 255);
    color = color >> 8; //再右移8位

    //取最初的color值的第23位到第16位
    *p_R = (unsigned char) (color & 255);
    color = color >> 8;//再右移8位

    //取最初的color值的第31位到第24位
    *p_A = (unsigned char) (color & 255);
}


//在给定的纹理像素位置中把颜色值设为color
void C_Texture::PutPixel(int x, int y, DWORD color)
{
   if (p_Pixels == NULL)
   {
       Error( _T("C_Texture::PutPixel :
              Cannot draw pixel before calling
              BeginDrawing"));
   }


   if ((x < 0) || (y < 0) || (x >= width) || (y >= height))
       return;
   *((DWORD *)&p_Pixels[y * pitch + (x << 2)]) = color;
}

//获取给定的纹理像素的颜色值
DWORD C_Texture::GetPixel(int x, int y) {
   if (p_Pixels == NULL) {
       Error(_T("C_Texture::GetPixel : Cannot get pixel
             before calling BeginDrawing"));
   }
   if ((x < 0) || (y < 0) ||
       (x >= width) || (y >= height))
       return 0;
   return *((DWORD *)&p_Pixels[y * pitch + (x << 2)]);
}

//把左上角坐标为(x1,y1),右上角坐标为(x2,y2)/矩形范围的所有像素填充成color颜色
void C_Texture::Bar(int x1, int y1, int x2,
                   int y2, DWORD color)
{
   if (p_Pixels == NULL)
   {
       Error(_T("C_Texture::Bar : Cannot draw bar
                 before calling BeginDrawing"));
   }

   // Perform simple clip
   if (x1 < 0) x1 = 0;
   if (y1 < 0) y1 = 0;
   if (x2 >= width) x2 = width - 1;
   if (y2 >= height) y2 = height - 1;

   if ((x1 >= width) || (y1 >= height)
      || (x2 < 0) || (y2 < 0) )
      return;
   int i, j;

   for (i = y1; i <= y2; i++)
   {
       for (j = x1; j <= x2; j++)
       {
       *((DWORD *)&p_Pixels[i * pitch + (j << 2)]) = color;
       }
   }
}

//把左上角坐标为(x1,y1),右上角坐标为(x2,y2)的矩形边上的像素填充成color颜色
void C_Texture::Rectangle(int x1, int y1, int x2,
                           int y2, DWORD color)
{
   int i;

   for (i = x1; i <= x2; i++)
   {
       PutPixel(i, y1, color);
       PutPixel(i, y2, color);
   }

   for (i = y1; i <= y2; i++)
   {
       PutPixel(x1, i, color);
       PutPixel(x2, i, color);
   }
}
在纹理上画线,或者说在计算机屏幕上画线,就要谈几何线段光栅化的问题。我们知道,从数学角度上而言,要绘制的各种几何线段在实数空间中都是连续的,而在计算机中,能组成这些几何线段的像素,或者说texel,都是一个一个单独离散的。也就是说,无法直接把在实数连续空间中的几何线段的每一个点直接对应上整数离散空间上的像素点或者是texel上。因此,在像素空间中上或者是texel空间中,连续的几何线段只能由若干个线段近似地模拟表示。把在实数连续空间中的点转换到整数离散空间中的过程,便是几何线段光栅化。
直线生成算法有很多,在PC平台上应用最为广泛的是DDA(数字微分分析法digital differential analyzer)算法和Bresenham算法。Bresenham算法的关键在于要弄清楚在有限的屏幕分辨率的屏幕,或者在“纹理逻辑视图”上绘制一条线段的时候,线段上某一个点,当绘制到屏幕或纹理上时,所绘制的像素或者是texel可能在真实点位置之上,也可能在真实点位置之下。也可能正好对应。所绘制的像素或者时texel与真实线段之间的偏差称为这条线段在这点上的“误差”(error)。当绘制线段的过程,从一个像素点或者是texel点进行到下一个像素点或者是texel上的时候,这个误差将用来作一个更加精确的近似——将一个给定的像素或texel在水平或者垂直方向,或者两个方向上同时,移动一个单位,背离前面绘制的一个点。
现在用一个例子来说明,给定两个点的坐标,这两个点将作为将要绘制的线段的端点,坐标空间则采用和计算机屏幕空间或纹理逻辑视图空间相同的坐标系,即原点在左上角,X增长的方向是水平向右,Y增长的方向是垂直向下。如图:
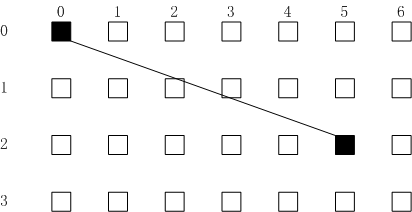
在图中,线段的两个端点正好落在显示的像素上,但这条线段的其他任何部分都没有正好落在像素点上,这也就是说,其他所有的像素都只能作为线段的一个近似。Bresenham算法采用的近似方法就是每次在新绘制一个像素点的时候,将它沿着线段的主方向移动一个像素的宽度,而当线段在沿次要方向移动的距离超过两个相邻的像素的一半的时候,沿着次方向则需要移动一个像素的宽度。在图中,x方向是主要方向,这意味着有6个点要进行绘制。每个X坐标绘制一点,依次为0,1,2,3,4,5,而算法的关键之处在于,给定了X坐标值的前提下,如何确定所这些像素点对应的Y坐标值。
从图中可以看出,合适的Y坐标值应为:即就是说,选定点的标准是:在给定了X坐标值的前提下,此点的Y坐标值是最靠近实际线段的点的Y坐标值。Bresenham算法也同样地基于同样的标准来进行判断。它实现这样的判断,方法是:对每个X值保持关于这条线不断变化的误差,即是从真实线到当前y坐标有多远。如图所示,如果这个变化的误差表明当前的Y坐标偏离真实线段到了某个程度,意思是说相邻的Y坐标更加接近真实线,则当前的Y坐标改变为相邻的Y坐标。
基于上面的算法,可以再举一个例子演示Bresenham算法如何一步一步地绘制如下图的线段,线段的起始点为(0,0),绘制最初的像素。显然该处的误差为0。
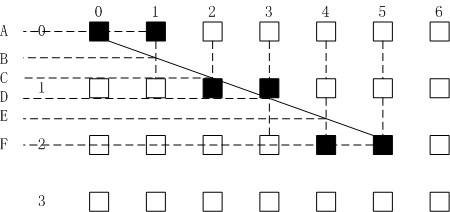
因为水平X轴为主要方向,下一个像素点的X坐标为1,那么这个像素的Y坐标为0,(意思是指:这个像素点的Y坐标保持和上一个像素点Y坐标一致),还是为1(意思是指:这个点的Y坐标比上一个点的Y坐标沿着Y轴方向递增1),取决于真实线在这一点上,其Y坐标值离哪个像素点的Y坐标更近。在这一点处的误差为B-A。这个误差小于1/2,(也即是说小于到两个像素点沿Y轴方向的中点)。因此,Y坐标在X=1处不改变,结果在(1,0)处绘制第二个像素。
第三个象素的X坐标为2,与当前的Y坐标(值为0)的误差为C-A,结果,此差值比1/2大。因此,下一个象素点Y坐标更靠近线段的实际位置,第三个象素将在(2,1)处绘制,并且从误差中减去1来弥补新Y坐标对旧Y坐标的调整。当前象素的误差实际上是C-D。
第四个像素的X坐标为3,该点处的误差应为E-D,因为误差小于1/2。因此当前Y坐标不改变,第4个像素将在(3,1)处绘制。
第五个象素的X坐标为4,该点处的误差应该为F-D,因为误差大于1/2,因此当前Y坐标前移,第5个象素点将在(4,2)处绘制,并从当前的误差值中减去1,当前的误差点为G-F。最后第六个点就是端点。这个点的X坐标为5,该点的误差为G-G,即为0,表明这个点正好在真实线上,正如设定的那样子第六个点就是终点。因此当前Y坐标保持不变。终点在(5,2)处绘制。线段的绘制结束。
//使用Bresenham算法来绘制直线
void C_Texture::Line(int x1, int y1, int x2,  int y2, DWORD color)
{
    //使用Bresenham algorithm算法
    int currentX = x1;
    int currentY = y1;
    int deltaX;
    int deltaY;
    int signDX;
    int signDY;
    int temp;
    int num2DYAfter;
    int num2DYm2DXAfter;
    bool swapXY = false;

    //从底到顶,或者是从顶到低,或者是两端点在同一垂直线上,即y2=y1
    if (y2 < y1) {
        signDY = -1;
    } else if (y1 < y2) {
        signDY = 1;
    } else {
        signDY = 0;
    }

    //从左到右,或者是从右到左,或者是两端点在同一水平线上,即X2=x1
    if (x2 < x1) {
        signDX = -1;
    } else if (x1 < x2) {
        signDX = 1;
    } else {
        signDX = 0;
    }

    PutPixel(x1, y1, color);

    //计算两端点的水平距离和垂直距离
    deltaX = abs(x2 - x1);
    deltaY = abs(y2 - y1);

    // Temporary for calculation
    temp = 2 * (deltaY - deltaX);

    //希望两端点的水平距离大于垂直距离
    if (deltaY > deltaX) {
        swap(deltaX, deltaY);
        swapXY = true;
    }

    // deltaX > deltaY, after swap
    num2DYAfter = 2 * deltaY;
    num2DYm2DXAfter = 2 * (deltaY - deltaX);

    // Loop along the longer axis to draw pixels
    // 沿着比较长的轴逐个绘制像素
    for (int i = 1; i <= deltaX; i++)
    {
        if (temp < 0)
        {
            if (swapXY) {
                currentY += signDY;
            } else {
                currentX += signDX;
            }

            PutPixel(currentX, currentY, color);
            temp += num2DYAfter;
        }
        else
        {
            currentX += signDX;
            currentY += signDY;
            PutPixel(currentX, currentY, color);
            temp += num2DYm2DXAfter;
        }
    }
}

//画圆算法
void C_Texture::Circle(int x, int y,
                        int radius, DWORD color)
{
    // Use Midpoint Circle algorithm
    int currentDX = 0;
    int currentDY = radius;
    int tempCal = 1 - radius;

    // Plot 4 starting points
    PutPixel(x, y + radius, color);
    PutPixel(x, y - radius, color);
    PutPixel(x + radius, y, color);
    PutPixel(x - radius, y, color);

    while (currentDX < currentDY) {
        currentDX++;
        if (tempCal < 0) {
            tempCal += 2 * currentDX + 1;
        } else {
            currentDY--;
            tempCal += 2 * (currentDX - currentDY) + 1;
        }

        // Plot 8 points
        PutPixel(x + currentDX, y + currentDY, color);
        PutPixel(x + currentDX, y - currentDY, color);
        PutPixel(x - currentDX, y + currentDY, color);
        PutPixel(x - currentDX, y - currentDY, color);
        PutPixel(x + currentDY, y + currentDX, color);
        PutPixel(x + currentDY, y - currentDX, color);
        PutPixel(x - currentDY, y + currentDX, color);
        PutPixel(x - currentDY, y - currentDX, color);
    }
}

//画椭圆
void C_Texture::Ellipse(int x, int y, int radiusX,
                        int radiusY, DWORD color)
{
    int radiusXP2 = radiusX * radiusX;
    int radiusYP2 = radiusY * radiusY;

    int radiusXP2m2 = radiusXP2 * 2;
    int radiusYP2m2 = radiusYP2 * 2;

    int currentDX = 0;
    int currentDY = radiusY;
    int tempX = 0;
    int tempY = radiusXP2m2 * radiusY;

    // Plot top and bottom most pixel
    PutPixel(x, y - radiusY, color);
    PutPixel(x, y + radiusY, color);

    int temp;

    // Draw the region where magnitude of the slope of the
    //tangent line to the ellipse is less than 1
    temp = (int)round(radiusYP2 -
                    (radiusXP2 * (radiusY - 0.25)));
    while (tempX < tempY)
    {
        currentDX++;
        tempX += radiusYP2m2;
        if (temp < 0) {
            temp += radiusYP2 + tempX;
        } else {
            currentDY--;
            tempY -= radiusXP2m2;
            temp += radiusYP2 + tempX - tempY;
        }
        PutPixel(x + currentDX, y + currentDY, color);
        PutPixel(x + currentDX, y - currentDY, color);
        PutPixel(x - currentDX, y + currentDY, color);
        PutPixel(x - currentDX, y - currentDY, color);
    }

    // Draw the rest
    temp = (int)round(radiusYP2 * (currentDX + 0.5) *
                (currentDX + 0.5) + radiusXP2 *
                (currentDY - 1) * (currentDY - 1)
                - radiusYP2 * radiusXP2);

    while (currentDY > 0)
    {
        currentDY--;
        tempY -= radiusXP2m2;
        if (temp > 0) {
            temp += radiusXP2 - tempY;
        } else {
            currentDX++;
            tempX += radiusYP2m2;
            temp += radiusXP2 - tempY + tempX;
        }
        PutPixel(x + currentDX, y + currentDY, color);
        PutPixel(x + currentDX, y - currentDY, color);
        PutPixel(x - currentDX, y + currentDY, color);
        PutPixel(x - currentDX, y - currentDY, color);
    }
}

void C_Texture::FloodFill(int x, int y, DWORD color)
{
    // Check if the point is in the screen or not

    int tempX, tempY;
    queue<int> xQueue;
    queue<int> yQueue;
    DWORD areaColor = GetPixel(x, y);
    xQueue.push(x);
    yQueue.push(y);

    while (!xQueue.empty()) {
        tempX = xQueue.front();
        tempY = yQueue.front();

        xQueue.pop();
        yQueue.pop();

        if ((tempX >= 0) && (tempY >= 0) &&
            (tempX < width) && (tempY < height) &&
            (GetPixel(tempX, tempY) == areaColor))
        {
            PutPixel(tempX, tempY, color);

            xQueue.push(tempX - 1);
            yQueue.push(tempY);

            xQueue.push(tempX + 1);
            yQueue.push(tempY);

            xQueue.push(tempX);
            yQueue.push(tempY - 1);

            xQueue.push(tempX);
            yQueue.push(tempY + 1);
        }
    }
}