Unity3D的可脚本化渲染流水线
请尊重原作者的工作,转载时请务必注明转载自:www.xionggf.com
1 Scriptable Render Pipeline

1.1 What is the Scriptable Render Pipeline
可编程的渲染流水线(Scriptable Render Pipeline,SRP) 是一项功能,可让您完全控制Unity的render pipeline,并提供一系列的工具,这些工具是在Unity中创建现代的高保真图形需要的。
SRP允许您编写C#脚本控制Unity渲染每一帧。在C#语言层面上,向您公开render pipeline,使得Unity在渲染时,不“暗箱操作”,即允许您确切地查看和控制渲染过程中发生的情况。这点是和原始的built-in renderpipe大有不同。
Unity为您提供了两个预构建的SRP,您可以使用它们作为自定义SRP的基础:
- 通用渲染流水线(Universal Render Pipeline,URP) 提供了从移动平台到高端控制台和PC上都通用的图形渲染功能。
- 高清晰度渲染管线(High Definition Render Pipeline,HDRP) 利用基于物理的光照技术渲染高保真的图形效果。HDRP以现代的,与compute shader兼容的平台为运行目标。
您可以以这些预先构建的SRP中的其中一个作为基础,修改它以适应自己的需求,而不是从头开始开发自己的SRP。
1.2 What is SRP Core
SRP Core是API的集合,它提供了许多渲染内部功能和配置。这些可以让您在项目中,精确控制渲染的方式。SRP API为许多广为人知的Unity结构提供了新的接口,其中包括:
- Lights
- Materials
- Cameras
- Command Buffers
SRP更改的是您与Unity交互的方式。 出于性能方面的考量,在编写自定义SRP时,使用的是一组渲染器,而不是单个。
2 Overview
从较高的角度来看,您可以将SRP分为两部分,即SRP asset和SRP instance。创建自定义渲染管道时,需要同时实现两者。
2.1 SRP Asset
SRP asset就是一个Unity asset文件,它代表pipeline的特定配置。它存储以下信息:
- game object是否需要向场景或者其他game object投射阴影。
- 要使用那种Shader质量级别。
- 阴影距离。
- 默认渲染材质配置。
除了上面四点之外,还可以把需要控制和保存的信息存储成SRP asset。Unity将会序列化这些要保存的信息,以存储成SRP asset。总之SRP asset表征了SRP的类型,以及用来配置“这种类型的SRP”的各种信息。
译注:上面的译文确实有点拗口,因为原文就是如此含糊不清。总得来说,SRP asset就是一种Unity的asset,显然,能够存成Unity asset的类对象自然是可序列化的。可以使用一个类去描述“render pipeline”这个概念,那么这个类的实例化对象可以序列化成一个asset文件,描述render pipe的各种设置也可以用一组类去描述,那么这组类的各个实例对象也可以序列化并存储为asset文件。这就是asset表征了SRP的类型,以及用来配置“这种类型的SRP”的各种信息这句话的意思。
2.2 SRP Instance
SRP instance是实际执行渲染的类。 当Unity看到项目使用SRP时,它将查看当前的SRP asset,并要求SRP asset提供一个渲染实例(rendering instance)。SRP asset必须返回一个包含有Render函数的实例。 通常,该实例还从SRP asset中缓存了许多针对render pipeline的设置。
SRP instance是实际执行渲染的类。 当Unity看到项目使用SRP时,它将查看当前的SRP资产并要求其提供渲染实例。 资产必须返回包含Render函数的实例。 通常,该实例还从SRP资产中缓存许多设置。
一个SRP instance可以同时表示一个rendering pipeline的配置。在渲染调用中,Unity可以执行以下操作:
- 清空帧缓冲区
- 执行场景拣选(Scene culling).
- 对需要渲染的game object进行渲染
- 执行从一个帧缓冲区 位块传送(blit) 数据到另一个帧缓冲区的操作。
- 渲染阴影。
- 执行后处理效果(post-processing effects)。
一个SRP instance同时也表示Unity执行的实际渲染操作。
3 Problems that the Scriptable Render Pipeline solves
如果“render pipeline”是指引擎执行的一系列步骤,这些步骤最终会把待渲染内容最终渲染到屏幕上。那么“scriptable render pipeline”则是指这样的一种render pipeline:它可以用C#代码去控制具体的操作步骤,按你所需要的方式去渲染出要显示的内容。
3.1 The Problem
传统上,Unity提供了许多可用的built-in pipelines。其中包括更适合移动和虚拟现实平台的forward renderer,以及更适合高端应用程序的deferred renderer。这些开箱即用的渲染解决方案是非常通用的,然而,这些内建的pipelines是一个知其然不知其所以然的“黑匣子”,有下面的一些缺点:
- 这些pipeline只会预设定的流程步骤去执行渲染。
- 这些pipeline是通用的,这意味着,它们什么都行,但是什么都不精。
- 这些pipeline不是非常有弹性且可配置的。因为它们是黑匣子,所以只能将渲染命令注入到预定义(pre-defined)的点。
- 扩展和修改容易出错,因为小的内部更改,可能会对外部(outward)产生较大的影响(ramifications)。
- Unity无法修复许多错误,因为这会改变行为,从而破坏项目。
3.2 The Solution
SRP Core API解决了上述问题。它把渲染操作,从内置的黑盒子,改为编写脚本去控制的每个步骤。您可以使用SRP Core API,从低到高控制Unity的渲染方式。
4 SRP Asset
通常使用RenderPipelineAsset类的一个子类去表征一个SRP asset。这个子类包含可用于配置render pipeline的接口。Unity首次执行渲染时,它将调用这个子类的InternalCreatePipeline函数,通过这个函数返回可用的rendering instance对象。
译注:如果对上面这段话觉得莫名奇妙,直接看下面的示例代码。Unity的文档就是那么的莫名其妙!
SRP asset本身是Scriptable Object,这意味着它可是一个project asset。可以将其保存在项目中,并且通过版本控制正确地管理使用它。如果要保存配置供其他人使用,则需要在项目中创建SRP asset资产。您可以通过脚本,像创建任何其他Scriptable Object一样,去创建SRP,然后通过Asset Database API保存它。
译注:简单地说,就是可以把SRP asset(你可以认为是继承于RenderPipelineAsset类的子类的对象实例),序列化保存在一个asset文件中。就像工程ProjectSetting目录下的那些.asset文件那样。
要使Unity在您的项目中使用SRP asset,需要通过【graphic settings】界面中设置SRP asset。在此处设置了对SRP asset的引用之后,Unity将在项目中使用你提供的SRP进行渲染,并将渲染所使用的配置,从标准的Unity渲染配置,转为使用你提供的SRP asset提供的配置。
除了返回rendering instance、保存配置数据外,您还可以使用SRP asset来提供许多辅助功能,例如:
- 用来创建3D game object的缺省材质球
- 用来创建3D game object的缺省材质球
- 用来创建particle system的缺省材质球
- 用来创建terrain的缺省材质球
这实质上是提供一些挂钩点(hook point),以确保在Unity3D编辑器中,基于一直以来使用内置render pipeline,从而所形成的操作习惯,在使用自定义的render pipeline的环境下,能够正确地被模拟。
4.1 An SRP Asset example
SRP asset包含渲染属性,并返回Unity可以用来渲染场景的rendering instance。如果SRP asset上的设置发生更改,Unity将销毁所有rendering instance,并使用新设置创建一个rendering instance,在下一帧使用上。
下面的示例演示了一个SRP asset类。它包含SRP rendering instance用来清除屏幕的颜色。还有一些仅在编辑器中可用的代码,可帮助用户在项目中创建SRP asset。这很重要,因为您需要在【graphic settings】窗口中设置此asset。
 1[ExecuteInEditMode]
 2public class BasicAssetPipe : RenderPipelineAsset
 3{
 4    public Color clearColor = Color.green;
 5
 6#if UNITY_EDITOR
 7    // Call to create a simple pipeline
 8    // 执行完此函数后,会在工程的Assets目录下生成一个名为BasicAssetPipe.asset的资产文件
 9    [UnityEditor.MenuItem("SRP-Demo/01 - Create Basic Asset Pipeline")]
10    static void CreateBasicAssetPipeline()
11    {
12        var instance = ScriptableObject.CreateInstance<BasicAssetPipe>();
13        UnityEditor.AssetDatabase.CreateAsset(instance, "Assets/BasicAssetPipe.asset");
14    }
15#endif
16
17    // Function to return an instance of this pipeline
18    protected override IRenderPipeline InternalCreatePipeline()
19    {
20        return new BasicPipeInstance(clearColor);
21    }
22}
5 SRP Instance
SRP asset控制配置,rendering instance是渲染入口点(rendering entry point)。在开发SRP时,您还需要创建此类(译注:即一个RenderPipeline类的子类),因为这是所有渲染逻辑所在的地方。
SRP rendering instance的最简单的形式,仅包含一个函数Render。然后用某种颜色填充颜色缓冲区并显示它。Render函数接受两个参数:
- 第一个参数是
ScriptableRenderContext类的对象实例。ScriptableRenderContext是一种命令缓冲区(command buffer),您可以要执行的渲染操作排队放入此缓冲区。 - 第二个参数是
Camera类的对象实例数组,这是一组用于渲染的摄影机。
5.1 A basic pipeline
此处的SRP asset示例返回一个SRP rendering instance,该rendering instance可能如下所示。
 1public class BasicPipeInstance : RenderPipeline
 2{
 3    private Color m_ClearColor = Color.black;
 4
 5    public BasicPipeInstance(Color clearColor)
 6    {
 7        m_ClearColor = clearColor;
 8    }
 9
10    public override void Render(ScriptableRenderContext context, Camera[] cameras)
11    {
12        // does not so much yet :()
13        base.Render(context, cameras);
14
15        // clear buffers to the configured color
16        var cmd = new CommandBuffer();
17        cmd.ClearRenderTarget(true, true, m_ClearColor);
18        context.ExecuteCommandBuffer(cmd);
19        cmd.Release();
20        context.Submit();
21    }
22}
该render pipeline的作用是执行简单的清除操作,将屏幕显示为给定颜色,这个颜色值是在SRP asset中设置的,Unity创建SRP rendering instance时获取并使用到。这里有几件事要注意:
- SRP将在很多渲染操作中,使用现有的Unity command buffer(在这种情况下为
ClearRenderTarget)。 - SRP根据传入的上下文调度
CommandBuffer类的实例对象。 - 在SRP中进行渲染的最后一步是调用
Submit函数。 这将在渲染上下文中,执行所有在队列中排好队的命令。 - 您可以在
RenderPipeline类的Render函数中输入自定义渲染器的渲染代码。 在这里,您可以执行诸如剔除,过滤,更改渲染目标和绘图之类的步骤。
6 The SRP Context
SRP使用“延迟执行(delayed execution)”的概念进行渲染。您建立命令列表(list of commands),然后执行它们。用于构建这些命令的对象,便称为ScriptableRenderContext,并这种类的对象实例作为参数传递给Render函数。
当用填充好ScriptableRenderContext类的实例对象,可以调用成员方法Submit,提交所有排队的渲染调用(rendering call),这些调用通常指由command buffer的实例,以及SRP特定的绘制命令的组合而成。例如,使用CommandBuffer对象去清除渲染目标。
译注:这句**“command buffer的实例,以及SRP特定的绘制命令的组合而成”**看不明白的话,直接看下面代码中
Render函数的内部实现你就理解了
 1public class BasicPipeInstance : RenderPipeline
 2{
 3    private Color m_ClearColor = Color.black;
 4
 5    public BasicPipeInstance(Color clearColor)
 6    {
 7        m_ClearColor = clearColor;
 8    }
 9
10    public override void Render(ScriptableRenderContext context, Camera[] cameras)
11    {
12        // does not so much yet :(
13        base.Render(context, cameras);
14
15        // clear buffers to the configured color
16        var cmd = new CommandBuffer();
17        cmd.ClearRenderTarget(true, true, m_ClearColor);
18        context.ExecuteCommandBuffer(cmd);
19        cmd.Release();
20        context.Submit();
21    }
22}
7 Culling in the Scriptable Render Pipeline
在渲染时要弄清楚哪些内容是要绘制在屏幕上,哪些是要剔除出去不绘制。**拣选(culling)**就是这样的一个过程。
在Unity中,拣选操作包括以下两点:
- 视锥拣选(frustum culling):计算存在于相机的近平面和远平面之间的Game Object。
- 遮挡拣选(occlusion culling):计算哪些game object隐藏在其他game object之后,然后剔除它们,不让它们参与渲染。
Unity开始渲染时,它需要计算的第一件事就是渲染什么。这需要操作相机,并且从相机的观察角度去执行剔除操作。剔除操作之后,会返回可被Camera渲染的game objects和lights列表。SRP在后面将在render pipeline中使用这些game object。
在SRP中,通常从摄影机的角度去渲染game object。这是SRP的摄像机对象和built in renderpipe的摄像机使用的类是一样的。SRP提供了许多用于拣选的API。通常的拣选流程如下所示:
 1// Create an structure to hold the culling paramaters
 2// 创建拣选用的参数
 3ScriptableCullingParameters cullingParams;
 4
 5// Populate the culling paramaters from the camera
 6// 根据当前的摄像机对象,获取到对应的拣选用的参数
 7if (!CullResults.GetCullingParameters(camera, stereoEnabled, out cullingParams))
 8    continue;
 9
10// if you like you can modify the culling paramaters here
11// 可以对从camera获取到的参数进行修改
12cullingParams.isOrthographic = true;
13
14// Create a structure to hold the cull results
15// 创建存储拣选结果的对象
16CullResults cullResults = new CullResults();
17
18// Perform the culling operation
19CullResults.Cull(ref cullingParams, context, ref cullResults);
8 Drawing in the Scriptable Render Pipeline
在可编写脚本的渲染管道(SRP)中,应该在拣选操作之后进行绘制。当您的SRP具有一组拣选结果时,它可以拣选结果中指定的game objects渲染到屏幕上。
请注意,可以通过多种方式配置render pipeline以渲染场景,因此在实现场景之前需要做出许多决定。其中许多决定是由以下因素所产生的:
- 您的render pipeline所面向的硬件设备。
- 您希望达到的特定外观。
- 您正在制作的项目类型。
例如,一个2D卷轴游戏,和一个3D高端PC平台上的第一人称视角游戏,具有极大不同的约束条件,因此应该具有极大不同的render pipeline。 做出实际决策的一些具体示例包括:
- HDR vs LDR
- Linear vs Gamma
- MSAA vs Post Process anti-aliasing
- Physically-based Materials vs Simple Materials
- Lighting vs No Lighting
- Lighting technique
- Shadowing technique
pipeline时做出这些决定,有助于您确定您的pipeline应该具有的约束。下面的示例演示了一个不带灯光的简单渲染器,该渲染器可以将某些game objects以不透明的方式渲染。
8.1 Filtering: Render Buckets and Layers
通常,game object具有特定的分类。 它们可以是不透明的,透明的,子表面等。Unity使用队列的概念来表示何时渲染GameObject。 这些队列构成一系列的bucket。Unity将会把game object放置到这些bucket内,当SRP开始渲染场景时,你可以指明要哪些bucket内的game object要渲染。
Unity将game object放入其中的存储区(源自对象上的Material)。SRP渲染场景时,您可以指定要使用的存储桶范围。除了使用bucket之外,您还可以使用Unity的layer去指明哪些game object要被相机所渲染,哪些不被渲染。
 1// Get the opaque rendering filter settings
 2var opaqueRange = new FilterRenderersSettings();
 3
 4//Set the range to be the opaque queues
 5opaqueRange.renderQueueRange = new RenderQueueRange()
 6{
 7    min = 0,
 8    max = (int)UnityEngine.Rendering.RenderQueue.GeometryLast,
 9};
10
11//Include all layers
12opaqueRange.layerMask = ~0;
8.2 Draw Settings: How things should be drawn
使用过滤和拣选,可以确定哪些game object是要被SRP渲染出来的。但是随后您需要确定SRP如何去渲染它们。 SRP提供了多种选项来配置这些被挑选出来的game object的渲染方式。用于配置此渲染方式的结构体是DrawRenderSettings。您可以用这个结构配置许多东西:
- 排序(Sorting) – 指定渲染game object的顺序,是从后往前,即先渲染离相机远的,然后渲染离相机近的game object,还是反过来,从前往后。
- 逐渲染器标识(Per-Renderer flags) –即是Unity要给shader转递什么样的“内建设置”(built in setting)。比如一些为逐个游戏对象(per-game object)使用的光探针,光照贴图等等。
- 逐渲染标识(Rendering flags) – SRP使用什么样的算法用来合批操作,例如,使用instancing或者非instancing操作。
- 着色器的渲染通路(Shader Pass) – 当前的这个draw call,SRP应该使用哪个渲染通路。
 1// Create the draw render settings
 2// note that it takes a shader pass name
 3var drs = new DrawRendererSettings(myCamera, new ShaderPassName("Opaque"));
 4
 5// enable instancing for the draw call
 6drs.flags = DrawRendererFlags.EnableInstancing;
 7
 8// pass light probe and lightmap data to each renderer
 9drs.rendererConfiguration = RendererConfiguration.PerObjectLightProbe |
10                            RendererConfiguration.PerObjectLightmaps;
11
12// sort the objects like normal opaque objects
13drs.sorting.flags = SortFlags.CommonOpaque;
8.3 Drawing
Now we have the three things we need to issue a draw call: 现在我们知道执行drwa call所需的三要素了:
- Cull results
- Filtering rules
- Drawing rules
此时,您现在可通调用过一个SRP context的DrawRenderer方法,以发出draw call。在SRP中,您通常不渲染单个网格,而是一次发出渲染大量网格的调用。这样可以减少脚本执行的开销,并可以在CPU上快速,按任务执行。
1// draw all of the renderers
2context.DrawRenderers(cullResults.visibleRenderers, ref drs, opaqueRange);
3
4// submit the context, this will execute all of the queued up commands.
5context.Submit();
上述代码,会将game object绘制到当前render target中。您可以使用command buffer来切换渲染目标。
9 XR Support in SRP
9.1 Virtual Reality
To use VR in SRP, enable VR and choose a VR SDK in Player Settings. Aside from that, you can configure VR settings using the XRGraphicsConfig class that SRP Core provides. Currently, XRGraphicsConfig provides an interface to XRSettings, which will be expanded to cover all knobs exposed by various XRSDK Subsystems as they become available.
10 Free Camera
The FreeCamera component provides you with an implementation for a simple free camera. When you add this component to a Camera, you can use the keyboard and mouse, or a controller, to control the Camera’s position and rotation in Play Mode.
10.1 Properties
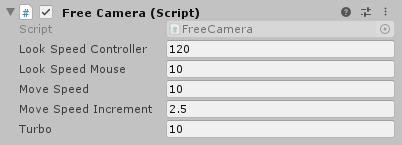
| Property | Description |
|---|---|
| Look Speed Controller | Set the look speed of the Camera when using a controller. |
| Look Speed Mouse | Set the look speed of the Camera when using a mouse. |
| Move Speed | Set the speed at which the Camera moves. |
| Move Speed Increment | Set the value of the increment that you can increase or decrease the Move Speed by. This is useful if you have a large Scene and the current Move Speed is not enough to easily traverse it. |
| Turbo | Set the value that this component multiplies the Move Speed by when you press the key or button assigned to “Fire1”. |
11 Camera Switcher
The CameraSwitcher component allows you to define a List of Cameras in the Scene and then use the Debug Window to switch between them in Play Mode. This is useful when you want a set of different fixed views for profiling purposes where you need to guarantee that the Camera view is in the same position between sessions.

11.1 Properties
| Property | Description |
|---|---|
| Cameras | Drag and drop GameObjects that have a Camera component attached to add them to this List of Cameras. The Debug Window can switch between the Cameras in this List. |