Deforming a mesh in Unity(翻译)
In this post, you will learn how to deform a mesh in Unity using various techniques so that you can select the most suitable one for your project when you need a specific or similar feature in your game. We will implement an effect using a basic function to displace vertices that resemble ripples on water.
在本文中,您将学习如何使用各种技术在 Unity 中变形网格,以便在您的游戏中需要特定或类似功能时,您可以为您的项目选择最合适的技术。我们将使用基本函数来实现一种效果,以置换类似于水波纹的顶点。
Jump ahead:
为什么要使用网格变形?Why use mesh deformation?
How to deform a mesh in Unity Mesh deformation with single-threaded implementation Using C# Job System implementation in Unity Mesh deformation with MeshData implementation Deforming mesh with the compute shader implementation Using Vertex Shader implementation in Unity Comparing performances of mesh deformation techniques in Unity Why use mesh deformation? There are plenty of features that require mesh deformation in a game, including grass swaying in the wind, character interactions, waves in the water, and even terrain features like snow crushing under a character’s foot. I could go on, but it’s obvious that using mesh deformation is important in a wide variety of games and genres. 游戏中有很多功能需要网格变形,包括风中摇曳的草地、角色互动、水中的波浪,甚至是角色脚下的积雪等地形特征。我可以继续,但很明显,使用网格变形在各种游戏和类型中都很重要。
如何在 Unity 中变形网格How to deform a mesh in Unity
First, we need a game object with the Deformer component and MeshFilter.
The base deformer MonoBehaviour should contain properties and cache the mesh object:
首先,我们需要一个带有Deformer组件和 的游戏对象MeshFilter。
基础变形器MonoBehaviour 应包含属性并缓存网格对象:
 1[RequireComponent(typeof(MeshFilter))]
 2public abstract class BaseDeformer : MonoBehaviour
 3{
 4   [SerializeField] protected float _speed = 2.0f;
 5   [SerializeField] protected float _amplitude = 0.25f;
 6   protected Mesh Mesh;
 7
 8   protected virtual void Awake()
 9   {
10       Mesh = GetComponent<MeshFilter>().mesh;
11   }
12}
To easily modify and calculate the displacement function, we created a utility class where displacement will be calculated. All approaches presented here will use the utility class, and it allows us to change the displacement function in the same place simultaneously for all methods:
为了轻松修改和计算位移函数,我们创建了一个用于计算位移的实用程序类。这里介绍的所有方法都将使用实用程序类,它允许我们在同一位置同时为所有方法更改位移函数:
1public static class DeformerUtilities
2{
3   [BurstCompile]
4   public static float CalculateDisplacement(Vector3 position, float time, float speed, float amplitude)
5   {
6       var distance = 6f - Vector3.Distance(position, Vector3.zero);
7       return Mathf.Sin(time * speed + distance) * amplitude;
8   }
9}
In this blog post, we will deform a mesh using the following techniques:
Single-threaded C# Job System MeshData Compute shader Vertex Shader
在这篇博文中,我们将使用以下技术对网格进行变形:
单线程 C#作业系统 网格数据 计算着色器 顶点着色器
单线程实现的网格变形 Mesh deformation with single-threaded implementation
This is the simplest approach for deforming a mesh in Unity. It can be a perfect solution for a small game that doesn’t have any other performance-based work.
We need to iterate Mesh.vertices over every Update() and modify them according to the displacement function:
这是在 Unity 中变形网格的最简单方法。对于没有任何其他基于性能的工作的小型游戏来说,它可能是一个完美的解决方案。
我们需要遍历每个并根据位移函数修改它们:Mesh.verticesUpdate()
 1public class SingleThreadedDeformer : BaseDeformer
 2{
 3   private Vector3[] _vertices;
 4
 5   protected override void Awake()
 6   {
 7       base.Awake();
 8       // Mesh.vertices return a copy of an array, therefore we cache it to avoid excessive memory allocations
 9       _vertices = Mesh.vertices;
10   }
11
12   private void Update()
13   {
14       Deform();
15   }
16
17   private void Deform()
18   {
19       for (var i = 0; i < _vertices.Length; i++)
20       {
21           var position = _vertices[i];
22           position.y = DeformerUtilities.CalculateDisplacement(position, Time.time, _speed, _amplitude);
23           _vertices[i] = position;
24       }
25
26       // MarkDynamic optimizes mesh for frequent updates according to docs
27       Mesh.MarkDynamic();
28       // Update the mesh visually just by setting the new vertices array
29       Mesh.SetVertices(_vertices);
30       // Must be called so the updated mesh is correctly affected by the light
31       Mesh.RecalculateNormals();
32   }
33}
在 Unity 中使用 C# 作业系统实现
Using C# Job System implementation in Unity In the previous approach, we iterated over the vertices array in every frame. So, how can we optimize that? Your first thought should be to do the work in parallel. Unity allows us to split calculations over worker threads so we can iterate the array in parallel.
You may argue that scheduling any work and gathering the result onto the main thread could have a cost. Of course, I can only agree with you. Therefore, you must profile your exact case on your target platform to make any assumptions. After profiling, you can determine whether you should use the Job System or another method to deform a mesh.
To use the C# Job System, we need to move the displacement calculation into a job:
在之前的方法中,我们在每一帧中迭代顶点数组。那么,我们如何优化呢?您的第一个想法应该是并行执行这些工作。Unity 允许我们在工作线程上拆分计算,以便我们可以并行迭代数组。
您可能会争辩说,安排任何工作并将结果收集到主线程上可能会产生成本。当然,我只能同意你的看法。因此,您必须在目标平台上分析您的确切案例以做出任何假设。分析后,您可以确定是否应该使用作业系统或其他方法来使网格变形。
要使用C# 作业系统,我们需要将位移计算移动到作业中:
 1[BurstCompile]
 2public struct DeformerJob : IJobParallelFor
 3{
 4   private NativeArray<Vector3> _vertices;
 5   [ReadOnly] private readonly float _speed;
 6   [ReadOnly] private readonly float _amplitude;
 7   [ReadOnly] private readonly float _time;
 8
 9   public DeformerJob(float speed, float amplitude, float time, NativeArray<Vector3> vertices)
10   {
11       _vertices = vertices;
12       _speed = speed;
13       _amplitude = amplitude;
14       _time = time;
15   }
16
17   public void Execute(int index)
18   {
19       var position = _vertices[index];
20       position.y = DeformerUtilities.CalculateDisplacement(position, _time, _speed, _amplitude);
21       _vertices[index] = position;
22   }
23}
Then, instead of deforming the mesh in Update(), we schedule the new job and try to complete it in LateUpdate():
然后,我们不在 中对网格进行变形,而是安排新作业并尝试在 中完成它:Update()LateUpdate()
 1
 2public class JobSystemDeformer : BaseDeformer
 3{
 4   private NativeArray<Vector3> _vertices;
 5   private bool _scheduled;
 6   private DeformerJob _job;
 7   private JobHandle _handle;
 8
 9   protected override void Awake()
10   {
11       base.Awake();
12       // Similarly to the previous approach we cache the mesh vertices array
13       // But now NativeArray<Vector3> instead of Vector3[] because the latter cannot be used in jobs
14       _vertices = new NativeArray<Vector3>(Mesh.vertices, Allocator.Persistent);
15   }
16
17   private void Update()
18   {
19       TryScheduleJob();
20   }
21
22   private void LateUpdate()
23   {
24       CompleteJob();
25   }
26
27   private void OnDestroy()
28   {
29     // Make sure to dispose all unmanaged resources when object is destroyed
30       _vertices.Dispose();
31   }
32
33   private void TryScheduleJob()
34   {
35       if (_scheduled)
36       {
37           return;
38       }
39
40       _scheduled = true;
41       _job = new DeformerJob(_speed, _amplitude, Time.time, _vertices);
42       _handle = _job.Schedule(_vertices.Length, 64);
43   }
44
45   private void CompleteJob()
46   {
47       if (!_scheduled)
48       {
49           return;
50       }
51
52       _handle.Complete();
53       Mesh.MarkDynamic();
54       // SetVertices also accepts NativeArray<Vector3> so we can use in here too
55       Mesh.SetVertices(_vertices);
56       Mesh.RecalculateNormals();
57       _scheduled = false;
58   }
59}
You can easily check if worker threads are busy in the Profiler:
您可以在Profiler中轻松检查工作线程是否繁忙:
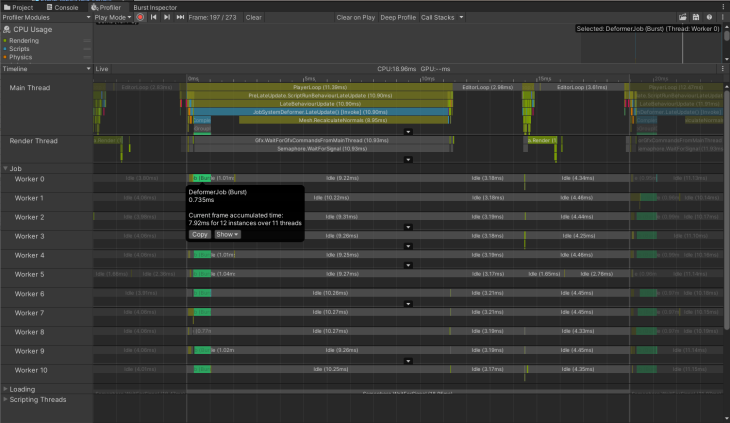
Example of Profiler for Checking Worker Threads in Unity
Mesh deformation with MeshData implementation
MeshData is a relatively new API that was added to Unity v2020.1. It provides a way to work with meshes within jobs, which allows us to get rid of the data buffer NativeArray _vertices.
This buffer was required because mesh.vertices return a copy of an actual array, so it was reasonable to cache this data and reuse the collection.
Instead, MeshData returns a pointer to the actual mesh data. From here, we can update the mesh every frame and get the pointer to the new data next frame before scheduling a new job — with no performance penalties related to allocating and copying large arrays.
So, the previous code transforms into:
使用 MeshData 实现的网格变形 MeshData是一个相对较新的 API,已添加到 Unity v2020.1。它提供了一种在作业中处理网格的方法,这使我们能够摆脱数据缓冲区。NativeArray _vertices
需要此缓冲区是因为返回实际数组的副本,因此缓存此数据并重用集合是合理的。mesh.vertices
相反,MeshData 返回一个指向实际网格数据的指针。从这里开始,我们可以每帧更新网格并在安排新作业之前获取下一帧指向新数据的指针——没有与分配和复制大型数组相关的性能损失。
所以,之前的代码转化为:
 1[BurstCompile]
 2public struct DeformMeshDataJob : IJobParallelFor
 3{
 4   public Mesh.MeshData OutputMesh;
 5   [ReadOnly] private NativeArray<VertexData> _vertexData;
 6   [ReadOnly] private readonly float _speed;
 7   [ReadOnly] private readonly float _amplitude;
 8   [ReadOnly] private readonly float _time;
 9
10   public DeformMeshDataJob(
11       NativeArray<VertexData> vertexData,
12       Mesh.MeshData outputMesh,
13       float speed,
14       float amplitude,
15       float time)
16   {
17       _vertexData = vertexData;
18       OutputMesh = outputMesh;
19       _speed = speed;
20       _amplitude = amplitude;
21       _time = time;
22   }
23
24   public void Execute(int index)
25   {
26       var outputVertexData = OutputMesh.GetVertexData<VertexData>();
27       var vertexData = _vertexData[index];
28       var position = vertexData.Position;
29       position.y = DeformerUtilities.CalculateDisplacement(position, _time, _speed, _amplitude);
30       outputVertexData[index] = new VertexData
31       {
32           Position = position,
33           Normal = vertexData.Normal,
34           Uv = vertexData.Uv
35       };
36   }
37}
以下是我们如何获取安排作业所需的所有数据: Here is how we get all the data needed to schedule the job:
 1private void ScheduleJob()
 2{
 3...
 4   // Will be writing into this mesh data
 5   _meshDataArrayOutput = Mesh.AllocateWritableMeshData(1);
 6   var outputMesh = _meshDataArrayOutput[0];
 7   // From this one
 8   _meshDataArray = Mesh.AcquireReadOnlyMeshData(Mesh);
 9   var meshData = _meshDataArray[0];
10   // Set output mesh params
11   outputMesh.SetIndexBufferParams(meshData.GetSubMesh(0).indexCount, meshData.indexFormat);
12   outputMesh.SetVertexBufferParams(meshData.vertexCount, _layout);
13   // Get the pointer to the input vertex data array
14   _vertexData = meshData.GetVertexData<VertexData>();
15   _job = new DeformMeshDataJob(
16       _vertexData,
17       outputMesh,
18       _speed,
19       _amplitude,
20       Time.time
21   );
22
23   _jobHandle = _job.Schedule(meshData.vertexCount, _innerloopBatchCount);
24}
您可能已经注意到我们得到, 而不仅仅是顶点数组:meshData.GetVertexData() You may have noticed that we get meshData.GetVertexData(), instead of just the vertices array:
1[StructLayout(LayoutKind.Sequential)]
2public struct VertexData
3{
4   public Vector3 Position;
5   public Vector3 Normal;
6   public Vector2 Uv;
7}
This lets us set all the vertex data in the output mesh data inside the job. Contrary to the prior techniques, where we modify the mesh directly and the vertex data is already there, the output mesh data doesn’t contain the vertex data inside the job when created. When using this structure, make sure that it contains all the data your mesh has; otherwise, calling GetVertexData() may fail or produce unwanted results.
For example, this one will work because it matches all vertex parameters:
这让我们可以在作业中设置输出网格数据中的所有顶点数据。与我们直接修改网格并且顶点数据已经存在的现有技术相反,输出网格数据在创建时不包含作业中的顶点数据。使用此结构时,请确保它包含您的网格所具有的所有数据;否则,调用可能会失败或产生不需要的结果。GetVertexData()
例如,这个可以工作,因为它匹配所有顶点参数:
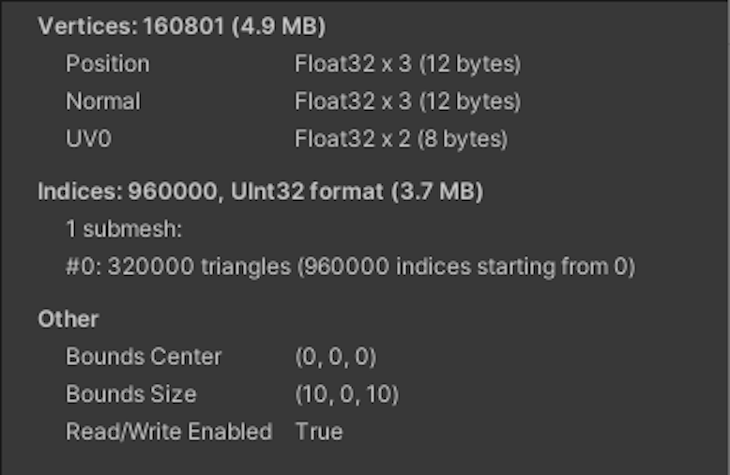 Example of Successful Unity Vertex Data Parameters
However, this example will fail because of a tangent:
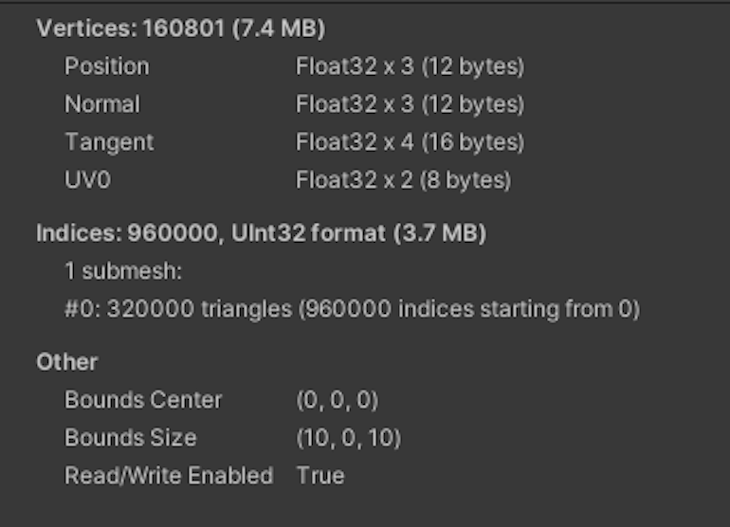
Example of Failed Unity Vertex Parameters If you need tangents, then you have to extend VertexData with the additional field. The same goes for any property you might add to a mesh.
After completing the job, we apply the data in the following way:
如果您需要切线,则必须VertexData使用附加字段进行扩展。这同样适用于您可能添加到网格的任何属性。
完成作业后,我们按以下方式应用数据:
 1private void UpdateMesh(Mesh.MeshData meshData)
 2   {
 3     // Get a reference to the index data and fill it from the input mesh data
 4       var outputIndexData = meshData.GetIndexData<ushort>();
 5       _meshDataArray[0].GetIndexData<ushort>().CopyTo(outputIndexData);
 6       // According to docs calling Mesh.AcquireReadOnlyMeshData
 7 // does not cause any memory allocations or data copies by default, as long as you dispose of the MeshDataArray before modifying the Mesh
 8       _meshDataArray.Dispose();
 9       meshData.subMeshCount = 1;
10       meshData.SetSubMesh(0,
11           _subMeshDescriptor,
12           MeshUpdateFlags.DontRecalculateBounds |
13           MeshUpdateFlags.DontValidateIndices |
14           MeshUpdateFlags.DontResetBoneBounds |
15           MeshUpdateFlags.DontNotifyMeshUsers);
16       Mesh.MarkDynamic();
17       Mesh.ApplyAndDisposeWritableMeshData(
18           _meshDataArrayOutput,
19           Mesh,
20           MeshUpdateFlags.DontRecalculateBounds |
21           MeshUpdateFlags.DontValidateIndices |
22           MeshUpdateFlags.DontResetBoneBounds |
23           MeshUpdateFlags.DontNotifyMeshUsers);
24       Mesh.RecalculateNormals();
25   }
Here is the entire script:
  1public class MeshDataDeformer : BaseDeformer
  2{
  3   private Vector3 _positionToDeform;
  4   private Mesh.MeshDataArray _meshDataArray;
  5   private Mesh.MeshDataArray _meshDataArrayOutput;
  6   private VertexAttributeDescriptor[] _layout;
  7   private SubMeshDescriptor _subMeshDescriptor;
  8   private DeformMeshDataJob _job;
  9   private JobHandle _jobHandle;
 10   private bool _scheduled;
 11
 12   protected override void Awake()
 13   {
 14       base.Awake();
 15       CreateMeshData();
 16   }
 17
 18   private void CreateMeshData()
 19   {
 20       _meshDataArray = Mesh.AcquireReadOnlyMeshData(Mesh);
 21       _layout = new[]
 22       {
 23           new VertexAttributeDescriptor(VertexAttribute.Position,
 24               _meshDataArray[0].GetVertexAttributeFormat(VertexAttribute.Position), 3),
 25           new VertexAttributeDescriptor(VertexAttribute.Normal,
 26               _meshDataArray[0].GetVertexAttributeFormat(VertexAttribute.Normal), 3),
 27           new VertexAttributeDescriptor(VertexAttribute.TexCoord0,
 28               _meshDataArray[0].GetVertexAttributeFormat(VertexAttribute.TexCoord0), 2),
 29       };
 30       _subMeshDescriptor =
 31           new SubMeshDescriptor(0, _meshDataArray[0].GetSubMesh(0).indexCount, MeshTopology.Triangles)
 32           {
 33               firstVertex = 0, vertexCount = _meshDataArray[0].vertexCount
 34           };
 35   }
 36
 37   private void Update()
 38   {
 39       ScheduleJob();
 40   }
 41
 42   private void LateUpdate()
 43   {
 44       CompleteJob();
 45   }
 46
 47   private void ScheduleJob()
 48   {
 49       if (_scheduled)
 50       {
 51           return;
 52       }
 53
 54       _scheduled = true;
 55       _meshDataArrayOutput = Mesh.AllocateWritableMeshData(1);
 56       var outputMesh = _meshDataArrayOutput[0];
 57       _meshDataArray = Mesh.AcquireReadOnlyMeshData(Mesh);
 58       var meshData = _meshDataArray[0];
 59       outputMesh.SetIndexBufferParams(meshData.GetSubMesh(0).indexCount, meshData.indexFormat);
 60       outputMesh.SetVertexBufferParams(meshData.vertexCount, _layout);
 61       _job = new DeformMeshDataJob(
 62           meshData.GetVertexData<VertexData>(),
 63           outputMesh,
 64           _speed,
 65           _amplitude,
 66           Time.time
 67       );
 68
 69       _jobHandle = _job.Schedule(meshData.vertexCount, 64);
 70   }
 71
 72   private void CompleteJob()
 73   {
 74       if (!_scheduled)
 75       {
 76           return;
 77       }
 78
 79       _jobHandle.Complete();
 80       UpdateMesh(_job.OutputMesh);
 81       _scheduled = false;
 82   }
 83
 84   private void UpdateMesh(Mesh.MeshData meshData)
 85   {
 86       var outputIndexData = meshData.GetIndexData<ushort>();
 87       _meshDataArray[0].GetIndexData<ushort>().CopyTo(outputIndexData);
 88       _meshDataArray.Dispose();
 89       meshData.subMeshCount = 1;
 90       meshData.SetSubMesh(0,
 91           _subMeshDescriptor,
 92           MeshUpdateFlags.DontRecalculateBounds |
 93           MeshUpdateFlags.DontValidateIndices |
 94           MeshUpdateFlags.DontResetBoneBounds |
 95           MeshUpdateFlags.DontNotifyMeshUsers);
 96       Mesh.MarkDynamic();
 97       Mesh.ApplyAndDisposeWritableMeshData(
 98           _meshDataArrayOutput,
 99           Mesh,
100           MeshUpdateFlags.DontRecalculateBounds |
101           MeshUpdateFlags.DontValidateIndices |
102           MeshUpdateFlags.DontResetBoneBounds |
103           MeshUpdateFlags.DontNotifyMeshUsers);
104       Mesh.RecalculateNormals();
105   }
106}
Deforming mesh with the compute shader implementation 使用计算着色器实现变形网格
Splitting the work over worker threads like in the previous example is a great idea, but we can split the work even more by offloading it to the GPU, which is designed to perform parallel work.
像前面的示例一样,将工作拆分到工作线程上是一个好主意,但我们可以通过将工作卸载到 GPU 来进一步拆分工作,GPU 旨在执行并行工作。
Here, the workflow is similar to the job system approach — we need to schedule a piece of work, but instead of using a job, we are going to use a compute shader and send the data to the GPU.
First, create a shader that uses RWStructuredBuffer as the data buffer instead of NativeArray. Apart from that and the syntax, the code is similar:
在这里,工作流程类似于作业系统方法——我们需要安排一项工作,但我们不使用作业,而是使用计算着色器并将数据发送到 GPU。
首先,创建一个用作数据缓冲区而不是. 除了语法之外,代码是相似的:RWStructuredBufferNativeArray
 1#pragma kernel CSMain
 2
 3struct VertexData
 4{
 5   float3 position;
 6   float3 normal;
 7   float2 uv;
 8};
 9
10RWStructuredBuffer<VertexData> _VertexBuffer;
11float _Time;
12float _Speed;
13float _Amplitude;
14
15[numthreads(32,1,1)]
16void CSMain(uint3 id : SV_DispatchThreadID)
17{
18   float3 position = _VertexBuffer[id.x].position;
19   const float distance = 6.0 - length(position - float3(0, 0, 0));
20   position.y = sin(_Time * _Speed + distance) * _Amplitude;
21   _VertexBuffer[id.x].position.y = position.y;
22}
23Pay attention to VertexData, which is defined at the top of the shader. We need its representation on the C# side too:
24
25[StructLayout(LayoutKind.Sequential)]
26public struct VertexData
27{
28   public Vector3 Position;
29   public Vector3 Normal;
30   public Vector2 Uv;
31}
Here, we create the request _request = AsyncGPUReadback.Request(_computeBuffer); in Update() and collect the result if it’s ready in LateUpdate():
在这里,我们创建请求并在准备就绪时收集结果:_request = AsyncGPUReadback.Request(_computeBuffer);Update()LateUpdate()
  1public class ComputeShaderDeformer : BaseDeformer
  2{
  3   [SerializeField] private ComputeShader _computeShader;
  4   private bool _isDispatched;
  5   private int _kernel;
  6   private int _dispatchCount;
  7   private ComputeBuffer _computeBuffer;
  8   private AsyncGPUReadbackRequest _request;
  9
 10   private NativeArray<VertexData> _vertexData;
 11
 12   // Cache property id to prevent Unity hashing it every frame under the hood
 13   private readonly int _timePropertyId = Shader.PropertyToID("_Time");
 14
 15   protected override void Awake()
 16   {
 17       if (!SystemInfo.supportsAsyncGPUReadback)
 18       {
 19           gameObject.SetActive(false);
 20           return;
 21       }
 22
 23       base.Awake();
 24       CreateVertexData();
 25       SetMeshVertexBufferParams();
 26       _computeBuffer = CreateComputeBuffer();
 27       SetComputeShaderValues();
 28   }
 29
 30   private void CreateVertexData()
 31   {
 32     // Can use here MeshData to fill the data buffer really fast and without generating garbage
 33       _vertexData = Mesh.AcquireReadOnlyMeshData(Mesh)[0].GetVertexData<VertexData>();
 34   }
 35
 36   private void SetMeshVertexBufferParams()
 37   {
 38       var layout = new[]
 39       {
 40           new VertexAttributeDescriptor(VertexAttribute.Position,
 41               Mesh.GetVertexAttributeFormat(VertexAttribute.Position), 3),
 42           new VertexAttributeDescriptor(VertexAttribute.Normal,
 43               Mesh.GetVertexAttributeFormat(VertexAttribute.Normal), 3),
 44           new VertexAttributeDescriptor(VertexAttribute.TexCoord0,
 45               Mesh.GetVertexAttributeFormat(VertexAttribute.TexCoord0), 2),
 46       };
 47       Mesh.SetVertexBufferParams(Mesh.vertexCount, layout);
 48   }
 49
 50   private void SetComputeShaderValues()
 51   {
 52       // No need to cache these properties to ids, as they are used only once and we can avoid odd memory usage
 53       _kernel = _computeShader.FindKernel("CSMain");
 54       _computeShader.GetKernelThreadGroupSizes(_kernel, out var threadX, out _, out _);
 55       _dispatchCount = Mathf.CeilToInt(Mesh.vertexCount / threadX + 1);
 56       _computeShader.SetBuffer(_kernel, "_VertexBuffer", _computeBuffer);
 57       _computeShader.SetFloat("_Speed", _speed);
 58       _computeShader.SetFloat("_Amplitude", _amplitude);
 59   }
 60
 61   private ComputeBuffer CreateComputeBuffer()
 62   {
 63       // 32 is the size of one element in the buffer. Has to match size of buffer type in the shader
 64       // Vector3 + Vector3 + Vector2 = 8 floats = 8 * 4 bytes
 65       var computeBuffer = new ComputeBuffer(Mesh.vertexCount, 32);
 66       computeBuffer.SetData(_vertexData);
 67       return computeBuffer;
 68   }
 69
 70   private void Update()
 71   {
 72       Request();
 73   }
 74
 75   private void LateUpdate()
 76   {
 77       TryGetResult();
 78   }
 79
 80   private void Request()
 81   {
 82       if (_isDispatched)
 83       {
 84           return;
 85       }
 86
 87       _isDispatched = true;
 88       _computeShader.SetFloat(_timePropertyId, Time.time);
 89       _computeShader.Dispatch(_kernel, _dispatchCount, 1, 1);
 90       _request = AsyncGPUReadback.Request(_computeBuffer);
 91   }
 92
 93   private void TryGetResult()
 94   {
 95       if (!_isDispatched || !_request.done)
 96       {
 97           return;
 98       }
 99
100       _isDispatched = false;
101       if (_request.hasError)
102       {
103           return;
104       }
105
106       _vertexData = _request.GetData<VertexData>();
107       Mesh.MarkDynamic();
108       Mesh.SetVertexBufferData(_vertexData, 0, 0, _vertexData.Length);
109       Mesh.RecalculateNormals();
110   }
111
112   private void OnDestroy()
113   {
114       _computeBuffer?.Release();
115       _vertexData.Dispose();
116   }
117}
Using Vertex Shader implementation in Unity
All previous techniques used different methods to modify data on the main or worker threads and on the GPU. Eventually, the data was passed back to the main thread to update MeshFilter.
Sometimes, you’ll need to update the MeshCollider so that Physics and Rigidbodies will work with your modified mesh. But what if there is no need to modify the Collider?
Imagine that you only need a visual effect using mesh deformation, such as leaves swaying in the wind. You can’t add many trees if every leaf is going to take part in physics calculations in every frame.
Luckily, we can modify and render a mesh without passing the data back to the CPU. To do that, we will add a displacement function to the Vertex Shader. This is a game-changer for performance because passing a large amount of data usually becomes a bottleneck in your game.
Of course, one buffer with mesh data will not make a significant difference. However, as your game expands, you should always profile to ensure that it won’t end up passing tons of different data for different features to the GPU and eventually become a bottleneck.
To produce a similar effect in a shader, create a surface shader in the menu.
Next, we’ll add our properties to the Properties block:
[PowerSlider(5.0)] _Speed (“Speed”, Range (0.01, 100)) = 2 [PowerSlider(5.0)] _Amplitude (“Amplitude”, Range (0.01, 5)) = 0.25 By default, there is no Vertex Shader function in the surface shader. We need to add vertex:vert to the surface definition:
#pragma surface surf Standard fullforwardshadows vertex:vert addshadow Additionally, addshadow is required for the surface shader to generate a shadow pass for new vertices’ positions instead of the original ones.
Now, we can define the vert function:
SubShader { … float _Speed; float _Amplitude;
   void vert(inout appdata_full data)
   {
       float4 position = data.vertex;
       const float distance = 6.0 - length(data.vertex - float4(0, 0, 0, 0));
       position.y += sin(_Time * _Speed + distance) * _Amplitude;
       data.vertex = position;
   }
… } GIF of an Effect in Unity That’s it! However, you might notice that because we don’t use MonoBehaviour, there’s nowhere to call RecalculateNormals(), and the deformation looks dull. Even if we had a separate component, calling RecalculateNormals() wouldn’t help because deformation only occurs on the GPU — meaning that no vertices data is passed back to the CPU. So, we’ll need to do it.
To do this, we can use the normal, tangent, and bitangent vectors. These vectors are orthogonal to each other. Because normal and tangent are in the data, we calculate the third one as bitangent = cross(normal, tangent).
Given that they are orthogonal and that normal is perpendicular to the surface, we can find two neighboring points by adding tangent and bitangent to the current position.
float3 posPlusTangent = data.vertex + data.tangent * _TangentMultiplier; float3 posPlusBitangent = data.vertex + bitangent * _TangentMultiplier; Don’t forget to use a small multiplier so that points are near the current vertex. Next, modify these vectors using the same displacement function:
float getOffset( float3 position) { const float distance = 6.0 - length(position - float4(0, 0, 0, 0)); return sin(_Time * _Speed + distance) * _Amplitude; }
void vert(inout appdata_full data) { data.vertex.y = getOffset(data.vertex); … posPlusTangent.y = getOffset(posPlusTangent); posPlusBitangent.y = getOffset(posPlusBitangent); … float3 modifiedTangent = posPlusTangent - data.vertex; float3 modifiedBitangent = posPlusBitangent - data.vertex; float3 modifiedNormal = cross(modifiedTangent, modifiedBitangent); data.normal = normalize(modifiedNormal); } Now, we subtract the current vertex from modified positions to get a new tangent and bitangent.
In the end, we can use the cross product to find the modified normal.
float3 modifiedTangent = posPlusTangent - data.vertex; float3 modifiedBitangent = posPlusBitangent - data.vertex; float3 modifiedNormal = cross(modifiedTangent, modifiedBitangent); data.normal = normalize(modifiedNormal); This method is an approximation, but it gives plausible enough results to use in plenty of cases.
GIF of Unity Effect Using Mesh Deformation Finally, here is the entire shader:
Shader “Custom/DeformerSurfaceShader” { Properties { _Color (“Color”, Color) = (1,1,1,1) _MainTex (“Albedo (RGB)”, 2D) = “white” {} _Glossiness (“Smoothness”, Range(0,1)) = 0.5 _Metallic (“Metallic”, Range(0,1)) = 0.0 [PowerSlider(5.0)] _Speed (“Speed”, Range (0.01, 100)) = 2 [PowerSlider(5.0)] _Amplitude (“Amplitude”, Range (0.01, 5)) = 0.25 [PowerSlider(5.0)] _TangentMultiplier (“TangentMultiplier”, Range (0.001, 2)) = 0.01 } SubShader { Tags { “RenderType”=“Opaque” } LOD 200
   CGPROGRAM
   #pragma surface surf Standard fullforwardshadows vertex:vert addshadow

   #pragma target 3.0

   sampler2D _MainTex;

   struct Input
   {
       float2 uv_MainTex;
   };

   half _Glossiness;
   half _Metallic;
   fixed4 _Color;
   float _Speed;
   float _Amplitude;
   float _TangentMultiplier;

   float getOffset( float3 position)
   {
       const float distance = 6.0 - length(position - float4(0, 0, 0, 0));
       return sin(_Time * _Speed + distance) * _Amplitude;
   }

   void vert(inout appdata_full data)
   {
       data.vertex.y = getOffset(data.vertex);


       float3 posPlusTangent = data.vertex + data.tangent * _TangentMultiplier;
       posPlusTangent.y = getOffset(posPlusTangent);
       float3 bitangent = cross(data.normal, data.tangent);


       float3 posPlusBitangent = data.vertex + bitangent * _TangentMultiplier;
       posPlusBitangent.y = getOffset(posPlusBitangent);


       float3 modifiedTangent = posPlusTangent - data.vertex;
       float3 modifiedBitangent = posPlusBitangent - data.vertex;
       float3 modifiedNormal = cross(modifiedTangent, modifiedBitangent);
       data.normal = normalize(modifiedNormal);
   }

   void surf(Input IN, inout SurfaceOutputStandard o)
   {
       fixed4 c = tex2D(_MainTex, IN.uv_MainTex) * _Color;
       o.Albedo = c.rgb;
       o.Metallic = _Metallic;
       o.Smoothness = _Glossiness;
       o.Alpha = c.a;
   }
   ENDCG
} FallBack “Diffuse” } Comparing performances of mesh deformation techniques in Unity To compare all approaches, we are going to use the Performance Testing package by Unity.
Let’s look at a basic test that allows us to run the sample app for 500 frames. From there, we’ll gather frame times to see the median frame time for each technique that we’ve discussed. We can also use a simple WaitForSeconds(x) enumerator, but this will yield a different amount of samples in the run for each technique because frame times differ:
[UnityTest, Performance] public IEnumerator DeformableMeshPlane_MeshData_PerformanceTest() { yield return StartTest(“Sample”); }
private static IEnumerator StartTest(string sceneName) { yield return LoadScene(sceneName); yield return RunTest(); }
private static IEnumerator LoadScene(string sceneName) { yield return SceneManager.LoadSceneAsync(sceneName); yield return null; }
private static IEnumerator RunTest() { var frameCount = 0; using (Measure.Frames().Scope()) { while (frameCount < 500) { frameCount++; yield return null; } } } As an example, I ran the test suit on the following configuration:
Intel Core i7-8750H CPU 2.20GHz (Coffee Lake), 1 CPU, 12 logical and 6 physical cores NVIDIA GeForce GTX 1070 The mesh under test has 160,801 vertices and 320,000 triangles.
Example of the Mesh Data Test for the Vertices in Unity Conclusion It’s clear that Vertex Shader is the winner here. However, it cannot cover all use cases that other techniques can, including updating a mesh Collider with the modified data.
Coming in second place is the compute shader, because it passes modified mesh data to the CPU, allowing it to be used in a wider variety of cases. Unfortunately, it is not supported on mobile before OpenGL ES v3.1.
The worst-performing approach we looked at was the single-threaded one. Although it is the simplest method, it can still fit into your frame budget if you have smaller meshes or are working on a prototype.
MeshData seems like a balanced approach if you’re targeting low-end mobile devices. You should check in the runtime if the current platform supports compute shaders, and then select MeshData or the compute shader deformer.
In the end, you must always profile your code before deciding about performance-critical parts of your game, so test your use case on a target platform when selecting any of these techniques. Check out the entire repository on GitHub.
Cut through the noise of traditional error reporting with LogRocket LogRocket Dashboard Free Trial Banner LogRocket is a digital experience analytics solution that shields you from the hundreds of false-positive errors alerts to just a few truly important items. LogRocket tells you the most impactful bugs and UX issues actually impacting users in your applications.
Then, use session replay with deep technical telemetry to see exactly what the user saw and what caused the problem, as if you were looking over their shoulder.
LogRocket automatically aggregates client side errors, JS exceptions, frontend performance metrics, and user interactions. Then LogRocket uses machine learning to tell you which problems are affecting the most users and provides the context you need to fix it.
Focus on the bugs that matter — try LogRocket today.
Share this: TwitterRedditLinkedInFacebook