Pixel-Perfect Outline Shaders for Unity
Table of Contents
请尊重原作者的工作,转载时请务必注明转载自:www.xionggf.com
以下是基于你提供的内容的总结和解读,保留示例代码和图片链接:
轮廓着色器的工作原理与优化
1. 经典轮廓技术
- 起源:在 2003 年游戏《XIII》中首次看到 3D 对象的轮廓效果,使用固定功能管线实现。
- 实现方式:通过网格的外壳(Outer Hull)和反转法线绘制轮廓,覆盖黑色纹理。
- 现代改进:使用顶点着色器在单独 Pass 中渲染略微膨胀的网格,剔除正面。
2. 经典轮廓技术的局限性
| 局限性 | 描述 |
|---|---|
| 轮廓宽度不均匀 | 轮廓宽度随物体形状和视角变化。 |
| 透视缩短 | 轮廓宽度随物体远离相机而变窄(透视投影)。 |
| 对象空间单位 | 轮廓宽度以对象空间单位指定,而非像素。 |
3. 经典轮廓着色器代码
Shader "Tutorial/Outline" {
    Properties {
        _Color ("Color", Color) = (1, 1, 1, 1)
        _Glossiness ("Smoothness", Range(0, 1)) = 0.5
        _Metallic ("Metallic", Range(0, 1)) = 0
        _OutlineColor ("Outline Color", Color) = (0, 0, 0, 1)
        _OutlineWidth ("Outline Width", Range(0, 0.1)) = 0.03
    }
    Subshader {
        Tags { "RenderType" = "Opaque" }
        CGPROGRAM
        #pragma surface surf Standard fullforwardshadows
        Input { float4 color : COLOR; }
        half4 _Color; half _Glossiness; half _Metallic;
        void surf(Input IN, inout SufaceStandardOutput o) {
            o.Albedo = _Color.rgb * IN.color.rgb;
            o.Smoothness = _Glossiness;
            o.Metallic = _Metallic;
            o.Alpha = _Color.a * IN.color.a;
        }
        ENDCG
        Pass {
            Cull Front
            CGPROGRAM
            #pragma vertex VertexProgram
            #pragma fragment FragmentProgram
            half _OutlineWidth;
            float4 VertexProgram(float4 position : POSITION, float3 normal : NORMAL) : SV_POSITION {
                position.xyz += normal * _OutlineWidth;
                return UnityObjectToClipPos(position);
            }
            half4 _OutlineColor;
            half4 FragmentProgram() : SV_TARGET { return _OutlineColor; }
            ENDCG
        }
    }
}
- 轮廓 Pass:通过
Cull Front剔除正面,沿法线偏移顶点位置生成轮廓。
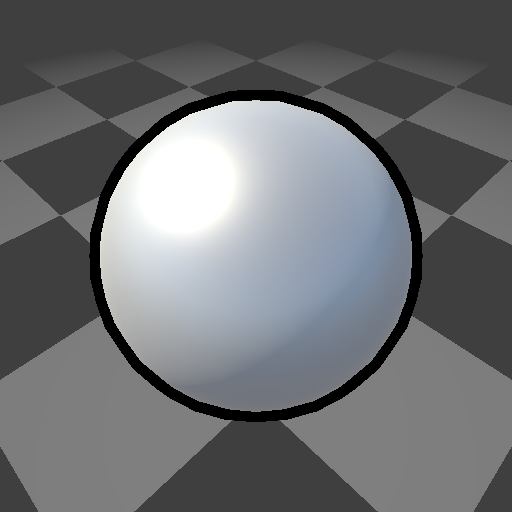
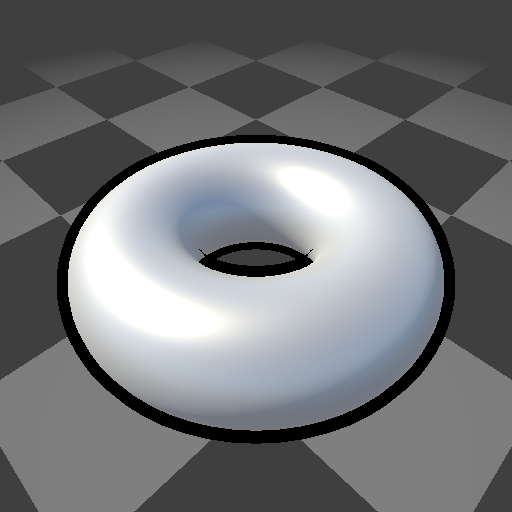
4. 示例效果
- 球体轮廓:
- 圆环轮廓:
5.优化技术
1. 在裁剪空间工作
为了消除对象缩放对轮廓宽度的影响,可以将顶点位置和法线转换到裁剪空间。这样,轮廓宽度不会随对象缩放而变化。以下是实现代码:
float4 clipPosition = UnityObjectToClipPos(position);
float3 clipNormal = mul((float3x3) UNITY_MATRIX_VP, mul((float3x3) UNITY_MATRIX_M, normal));
clipPosition.xyz += normalize(clipNormal) * _OutlineWidth;
2. 二维偏移
在裁剪空间中,仅对 x 和 y 方向进行偏移,可以进一步稳定轮廓宽度,减少视角变化的影响。以下是实现代码:
float2 offset = normalize(clipNormal.xy) * _OutlineWidth;
clipPosition.xy += offset;
3. 消除透视缩短
透视缩短会导致轮廓宽度随物体远离相机而变窄。为了消除这种影响,可以在偏移量中乘以裁剪空间位置的 w 分量,以抵消透视除法的影响。以下是实现代码:
float2 offset = normalize(clipNormal.xy) * _OutlineWidth * clipPosition.w;
clipPosition.xy += offset;
4. 像素级精度
为了实现精确的像素级轮廓宽度,可以根据屏幕宽高比调整偏移量,并将轮廓宽度直接指定为像素值。以下是实现代码:
float2 offset = normalize(clipNormal.xy) / _ScreenParams.xy * _OutlineWidth * clipPosition.w * 2;
clipPosition.xy += offset;
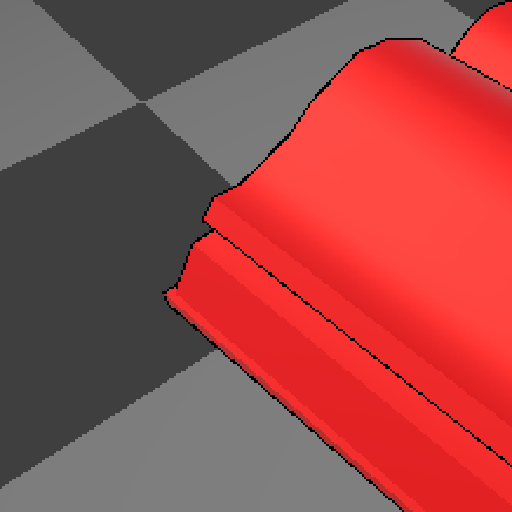
5. 处理尖锐边缘
尖锐边缘会导致轮廓效果不佳。可以通过以下方法解决:
- 平滑边缘:通过平滑法线或倒角(grazing angle)处理尖锐边缘。
- 单独网格:使用具有平滑法线的单独网格绘制轮廓。
- 顶点颜色存储法线:将平滑法线数据存储在顶点颜色通道中。
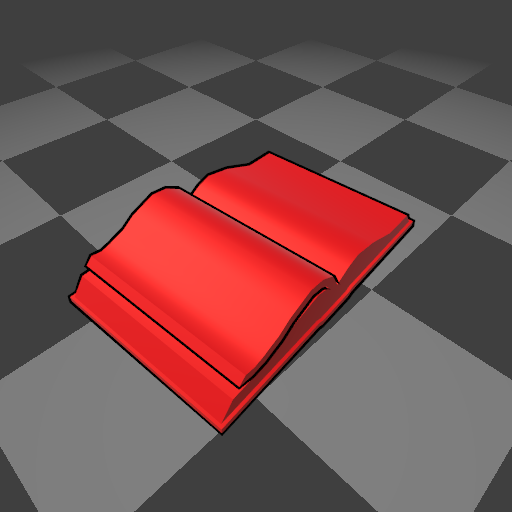
6. 最终效果
- 像素级轮廓:
- 抗锯齿效果:
总结
- 经典技术:适合手绘风格,但轮廓宽度不稳定,受透视影响。
- 优化技术:通过裁剪空间、二维偏移、消除透视缩短和像素级精度,实现更稳定的轮廓效果。
- 适用场景:经典技术适合手绘风格,优化技术适合 UI 和像素艺术风格。